Saturday, July 14, 2018

iPhone Data Usage Tips

iPhone Data Usage Tips

If you're on a limited or shared data plan, downloading a bunch of app updates or IOS upgrade over your cellular data can be really frustrating. The good news is, there are several options within IOS 11 to tweak the cellular data usage settings so you can avoid downloading many of the typical bandwidth hogs unless you're on WiFi.

Recommendations

  • Disable Cellular Data - Automatic Downloads
  • Disable Cellular Data - Video Autoplay
  • Disable - Wi-Fi Assist
  • Disable Cellular Data  - Background App Refresh

Automatic Downloads

On IOS 11, go to Settings -> iTunes & App Stores: Set Use Cellular Data to "Off".


Video Autoplay

On IOS 11, go to Settings -> iTunes & App Stores -> Video Autoplay: Set to Wi-Fi Only.

Wi-Fi Assist

On IOS 11, go to Settings -> Cellular: Set Wi-Fi Assist to "Off".

Background App Refresh

On IOS 11, go to Settings -> General -> Background App Refresh -> Background App Refresh On: Set to Wi-Fi.

Disable Cellular Data

If all else fails, you can simply disable use of all cellular data, at least temporarily until your data usage cycle resets. Go to Settings -> Cellular: Set Cellular Data to "Off".


Sunday, July 8, 2018

Running Linux on Windows (WSL)

Running Linux on Windows (WSL: Windows Subsystem for Linux)


The Windows Subsystem for Linux is fully available in Windows 10 release 1709 (Fall Creators Update). This lets you drop into bash from a Windows command prompt. The default distributions available in the Microsoft Store are Ubuntu, openSuse Leap, SUSE Linux Enterprise Server, Debian, and KALI. But what if you want to run another version like CentOS or similar? That's where RoliSoft's WSL Distribution Switcher comes into play. This python based set of scripts allows you to download Docker hub versions of Linux and run them from the WSL command line. Here's what I had to do to get CentOS 7 running on my Windows 10 machine.

Prerequisites


Installing WSL Feature in Windows 10


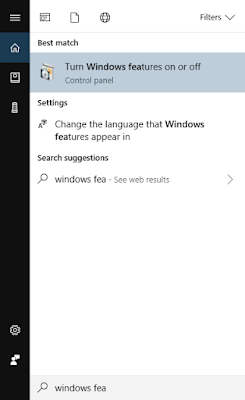
From the Windows search bar type Windows Feature and you should see the "Turn Windows Features On and Off" program.

Scroll all the way to the bottom of the list and you should now see the "Windows Subsystem for Linux". Check the box to the left and click OK to install. Please note, this will require a reboot of your computer to complete.


Install Python3 for Windows


I have written a separate blog post on installing Python 3.7 for Windows. You can view that here.

Install WSL Distribution Switcher


Before you can run the WSL Distribution Switcher Python scripts, you'll need to prep the WSL environment so everything will work properly. The two basic commands related to WSL you'll need to run are lxrun.exe and wslconfig. By default there isn't a Linux distribution loaded after the WSL feature is enabled. If you only wanted to run one of the distributions available from the Microsoft Store you could simply go there and download/install your flavor of choice. However if you want to run a distribution not currently available on the store, this is what you'll need to do.

Install the Legacy WSL Ubuntu distro:
lxrun.exe /install


Next run the following to verify that the distribution is installed:
wslconfig /list /all

You'll see where any previously installed distributions from the Microsoft Store (Ubuntu in this example) are installed and set to the default. In order for the Distribution Switcher scripts to run however, we need the Legacy distro as the default.

wslconfig /s legacy


In order for everything to install smoothly, the root account needs to be the default user for the bash shell. To set this run:
lxrun /setdefaultuser root


Now that everything is properly prepared for the Distribution Switcher scripts, the installation should run normally. CD to the directory where you downloaded the WSL Distribution Switcher Scripts, in this example E:\Linux and run the installer:
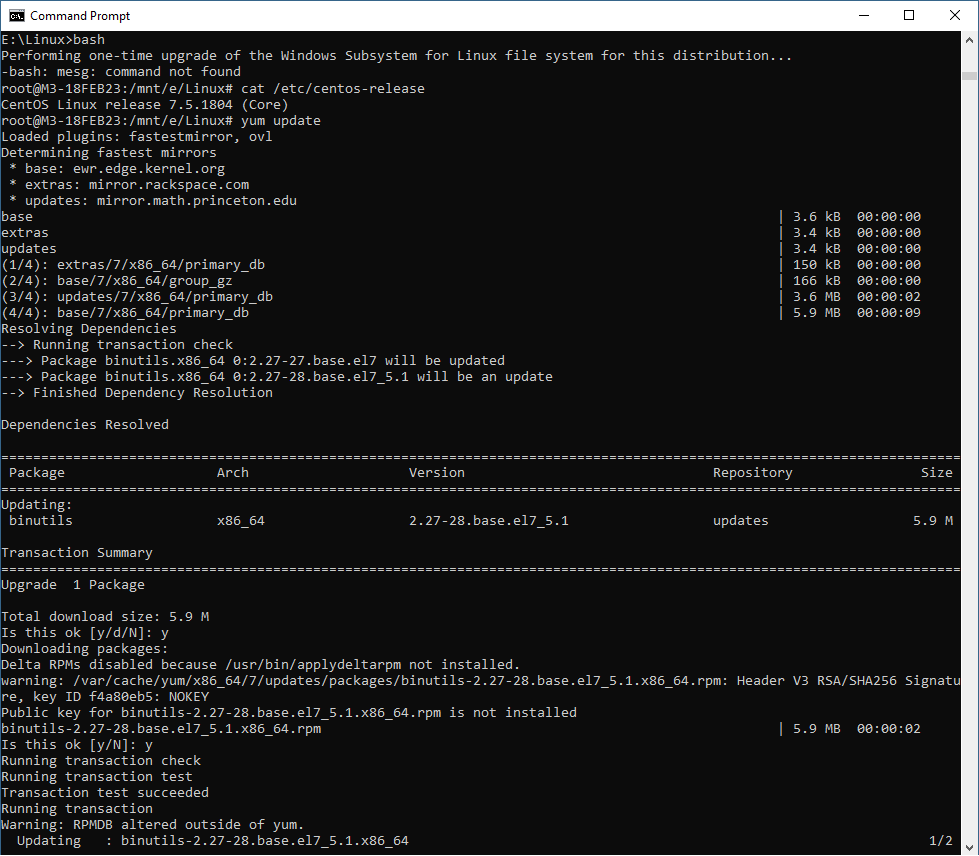
python3 install.py centos:latest


You can see from the above screenshot CentOS 7.5 is installed and I was able to update via a yum update command. To get to the Linux shell from a Windows command prompt simply type bash.

You can now install other Linux distributions from the WSL Distribution Switcher as necessary.

Here's a repository list they support:

Installing Python 3.7 on Windows

Installing Python 3.7 on Windows


Python is a great scripting language and is available for both Linux and Windows. The installation is very simple and straightforward and will allow you to run python scripts directly from a Windows command prompt.

Prerequisites


Download


Start by browsing to the python.org homepage from the link above and select the latest version. This example is for Python 3.7. I am running Windows 10 so I elected to download the Windows x86-64 executable installer.

Installation


Launch the above downloaded application and you should see a typical Windows application install wizard. Be sure to check both boxes for all users, and to add Python to PATH. This makes running python commands from a command prompt much easier.

Click "Install Now" and the installation should progress.


Once you see the "Setup was successful" screen, click the Close button. To verify if Python is now installed and working browse to the installation directory (Default: C:\Users\Username\AppData\Local\Programs\Python\Python37).
If you see python.exe and etc as listed above, you should be able to execute python commands/scripts from the command line. If you want to do some of your own scripting, I would highly recommend an editor such as PyCharm from Jet Brains.

Tuesday, March 13, 2018

Exchange 2010 - Outlook Web App Didn't Initialize

Outlook Web App Didn't Initialize

I recently ran across this problem again and decided I should blog this issue for future reference. Unfortunately Exchange 2010 is still used today even though it is no longer officially supported by Microsoft. When you do run across odd issues with older software it can be a real pain to get things working properly again. In this case I had to migrate an Exchange 2010 server to VMware because that was the company's e-mail server with the intention of migrating it to Exchange 2016 later. This is running on Windows Server 2012 R2.

Outlook Web App Error:

After migrating the server I was getting the following error when attempting to access https://mail.mydomain.com/owa/ "Outlook Web App didn't initialize. If the problem continues, please contact your helpdesk." This is a super helpful and descriptive error, thanks Microsoft!

This error actually has to do with a mismatching IIS virtual directory authentication method and Exchange's Client Access OWA authentication method.

Solution:

The proper settings if you want to enable forms based authentication (ideal for users outside the local domain), you'll want to set the Exchange OWA authentication method to Forms Based and select the local domain for your user accounts.

Start by browsing to MS Exchange->Server Configuration->Client Access: then select owa (Default Web Site) from the Outlook Web App tab.

Make note of the Internal and External URLs as those could be different.


Next click the "Authentication" tab from the owa (Default Web Site) Properties menu.


Make sure you select "Use forms-based authentication" then select the logon format that you prefer. I recommend "User name only" and setting the Logon domain to the company.local or whatever is appropriate for your organization.

You'll want to repeat the process with the ecp (Default Web Site) under the Exchange Control Panel tab as well. Make sure you have "Use forms-based authentication" set.


The next step is to verify that the authentication settings are correct within IIS. In my example I opened the Default Web Site and browsed to ecp and owa. On each of them select the Authentication icon. 


Make sure the "Basic Authentication" setting is enabled and the rest are disabled


If you run basic authentication you'll also want to ensure that the website requires SSL to connect. Select the SSL Settings icon then check the box "Require SSL" and make sure "Client certificates" is said to "Ignore".


Additional Notes:

If you receive the WINRM error when trying to access the Exchange Management Console (EMC) then check to make sure the IIS Default Web Site has an entry for all available IPs on port 443 and 80. This can happen if you use named redirects with multiple NICs/IPs.


Saturday, March 3, 2018

Ubuntu Server - Landscape

Ubuntu Server - Landscape

Ubuntu's Landscape 17.03 is a centralized update management server for Ubuntu Server and Desktop. It allows you to configure a central Landscape server and the join your Ubuntu machines to that Landscape server with the Landscape client. The setup is relatively painless and provides some nice reporting as well as centralized management. Very handy stuff from Ubuntu! The free license will allow for management of 10 stand alone servers. You can purchase additional server licenses directly from Canonical with their advantage support.

Landscape Server Install:

After your initial Ubuntu server installation completes (I ran LTS 16.04) from the SSH prompt run the following:

 sudo add-apt-repository ppa:landscape/17.03 

 sudo apt update 

 sudo apt install landscape-server-quickstart 

Once the installation has completed you'll be able to browse to https://hostname.FQDN/ and access the management website for Landscape. The first step is to setup all of the account settings so you can start deploying the clients. Click on "Account" and enter the appropriate information. To get the information you'll need for the client install later click the link on the left side of the page that says "following these instructions".


On the account page you'll want to enter your company name or designation and optionally you can input a registration_key.


The client setup page gives an example of what to enter to install the Landscape client on your Ubuntu servers. I'll go into more depth on that setup in the next section.


Landscape Client Install:

The client install should be run on any Ubuntu server you wish to manage from the Landscape server. I ran this on both version 14 and 16 servers. The first thing you'll need to do is copy the server certificate to the client's you want to register. I used WinSCP to download the certificate to my workstation and then used WinSCP again to copy the certificate to the client computer. You could also do this using ssh directly.

Landscape server certificate path:  /etc/ssl/certs/landscape_server_ca.crt 

Copy to the client here:  /etc/landscape/server.pem 

Now edit the  /etc/landscape/client.conf  file and add the following line to the end of the file:

 pico /etc/landscape/client.conf 

It probably looks something like this:
[client]
log_level = info
data_path = /var/lib/landscape/client
account_name = standalone


Now add the following line to the end of the file:
 ssl_public_key = /etc/landscape/server.pem 

Now you can run the installation on the client:

 sudo apt-get update 

 sudo install landscape-client

sudo landscape-config --computer-title "My Web Server" --account-name standalone -p registration_key --url https://hostname.FQDN/message-system --ping-url http://hostname.FQDN/ping

You will be prompted to enter some information on screen. Most of that is not critical and can be changed later. The defaults are likely what you want. The last step will ask you to register the client with the server, select Y there and then go back to the Landscape web application and you should now see your computer under the "Computers" tab.

That's pretty much all there is to it, you can also use Landscape to manage cloud based Ubuntu deployments including within AWS.

Tuesday, February 13, 2018

Cisco - ASDM Java Bug Windows 10

Cisco ASDM Java Bug

There apparently exists a bug in the Cisco ASDM with the ASA-X series when the Firepower services are enabled. The gist of the bug is that with Windows 10 and possibly other Windows OSes (Server 2008 R2 for me) you must run JRE 7.51 or you cannot get the ASDM to load. Oddly enough I was able to get the ASDM to run on the standby ASA but not the primary.

Workaround:

In order to get around the ASDM and Windows 10 compatibility bug, you'll have to install JRE 7 update 51. This can be download from the archives if you have a valid Oracle support account.
I can confirm this worked for me on Windows Server 2008 R2 as well. I was using a Cisco ASA 5516-X failover cluster.

Monday, February 5, 2018

VMware - Installing VMware Tools on Linux

Installing VMware Tools on Linux

There are two different sets of VMware Tools available for Linux, the standard VMware tools ISO package that comes with VMware and the Open-VM-Tools package available within package manager repositories for distros like Ubuntu or RedHat. From what I've read, both appear to work well and I have not observed any difference between the two when running them in a production environment.

Installing VMware-Tools:

If you're using VMware Tools included with vCenter then you must first mount the ISO in order to access the "cd" from the guest Linux operating system. To do so first edit the configuration of the VM and select the CD/DVD Drive:

Once you have selected to "Connect to CD/DVD image on a datastore..." you can browse to the native datastore on the vSphere server and select the vmimages -> tools-isoimages folder and then the linux.iso file.


Once the ISO file is connected you can proceed to the console of the Linux server and enter the following commands to install VMware Tools.
  • sudo mkdir /mnt/cdrom
  • sudo mount /dev/cdrom /mnt/cdrom OR sudo mount /dev/sr0 /mnt/cdrom
  • cd /mnt/cdrom
  • tar xzvf /mnt/cdrom/VMwareTools-x.x.x-xxxx.tar.gz -C /tmp/
  • cd /tmp/vmware-tools-distrib/
  • sudo ./vmware-install.pl -d

Installing Open-VM-Tools:

In order to install using a package manager such as aptitude, you will actually load the open-vm-tools rather than the standard VMware tools. Obviously the above process will work in any flavor of Linux but it's fully manual compared to using a tool like apt-get or yum to install or update the packages. The following commands are necessary to complete the open-vm-tools installation.

In Ubuntu Server:

  • sudo apt-get install open-vm-tools
In RedHat Server:
  • sudo yum install open-vm-tools
In either case, vCenter will show that VMware Tools is installed and display the version number regardless of which package you install, VMware Tools or Open-VM-Tools.

Sunday, January 28, 2018

VMware - Migrating Exchange P2V

Migrating Microsoft Exchange P2V with VMware

A lot of what you read online related to migrating from a physical to virtual (P2V) MS Exchange server will say don't do it. That's probably good advice, but when you have no other choice, here's some tips I found that helped me get this working.

This was a Server 2012 R2 with Exchange 2010 migrated to VMware 6.5 using the VMware Converter tool. The best steps I've found to make this as successful as possible are:

  • Disable all Exchange services before starting the conversion
  • Make note of all network related settings, specicially all IP addresses used
  • Run the P2V Converter, don't change the disk sizes, leave them as is
  • After the conversion install VMware Tools
  • Assign all IP addresses to the new virtual NIC(s)
  • In Device Manager select "Show Hidden Devices" and remove all unused devices related to the physical hardware
  • Reboot
  • Enable the Exchange services
  • Reboot
  • Test for inbound/outbound mail flow

Disable Exchange Services:

The first step before migrating your Exchange server from physical to virtual is to disable all of the Exchange services. This will accomplish two things, firstly it will speed up the boot process of the virtual server after it has been converted because you won't have to wait on them to start. Secondly it will prevent new mail from coming in while the server is being migrated. You could also accomplish this by stopping SMTP routing to the server but that would involve changing other systems in addition to Exchange. I like to use a simple command line script to stop the services.
  • sc config "MSExchangeADTopology" start= disabled
  • sc config "ADAM_MSExchange" start= disabled
  • sc config "MSExchangeAB" start= disabled
  • sc config "MSExchangeAntispamUpdate" start= disabled
  • sc config "MSExchangeEdgeCredential" start= disabled
  • sc config "MSExchangeEdgeSync" start= disabled
  • sc config "MSExchangeFDS" start= disabled
  • sc config "MSExchangeFBA" start= disabled
  • sc config "MSExchangeIMAP4" start= disabled
  • sc config "MSExchangeIS" start= disabled
  • sc config "MSExchangeMailSubmission" start= disabled
  • sc config "MSExchangeMailboxAssistants" start= disabled
  • sc config "MSExchangeMailboxReplication" start= disabled
  • sc config "MSExchangeMonitoring" start= disabled
  • sc config "MSExchangeProtectedServiceHost" start= disabled
  • sc config "MSExchangeRepl" start= disabled
  • sc config "MSExchangeRPC" start= disabled
  • sc config "MSExchangeSearch" start= disabled
  • sc config "WSBExchange" start= disabled
  • sc config "MSExchangeServiceHost" start= disabled
  • sc config "MSSpeechService" start= disabled
  • sc config "MSExchangeSA" start= disabled
  • sc config "MSExchangeThrottling" start= disabled
  • sc config "MSExchangeTransport" start= disabled
  • sc config "MSExchangeTransportLogSearch" start= disabled
  • sc config "MSExchangeUM" start= disabled
  • sc config "msftesql-Exchange" start= disabled
  • sc config "w3svc" start= disabled
  • sc config "iisadmin" start= disabled
Not all of these services will be installed on every Exchange instance but I listed all of them for reference.


Note All Network Settings:

This may sound obvious since you probably already know the IP address of the Exchange server but keep in mind sometimes there's additional NICs or IP addresses for specific services such as a send/receive connector. Double checking this won't hurt and it might save you some time afterwards.


Clean Up Device Manager:

After you've run the VMware Converter tool and have your new VM up and running be sure to install VMware Tools before doing anything else. This will ensure all of the necessary virtual drivers are installed and up to date. Once the network drivers are loaded you can add back all of your static IPs and mirror the previous physical server's configuration. Assuming you have done those two items you now need to remove all of the previously used hardware that is no longer necessary from Device Manager. First enable the "Show Hidden Devices" option in Device Manager so that you can see all of the old grayed out devices.
Now you can expand each section within the Device Manager tree and remove the grayed out devices. The two key areas to check that will likely cause the most issues are under Network Adapters and Portable Devices -> Exchange. The behavior I experienced was an inability to send e-mail via the SMTP Send Connector. This was due to the leftover network settings from the physical server. Once I removed those I could send e-mail just fine. The really odd and frustrating part of this conversion was that everything except sending worked correctly as soon as I configured the network and started back up all of the Exchange services.

Enable Exchange Services:

The last step before testing to make sure everything is functioning normally is to reset all of the Exchange services from disabled to auto and reboot so they can start cleanly. The process to enable the services is exactly the same as disabling, the status just needs to be auto instead of disabled. Again I've listed those below for reference and scripting purposes.
  • sc config "MSExchangeADTopology" start= auto
  • sc config "ADAM_MSExchange" start= auto
  • sc config "MSExchangeAB" start= auto
  • sc config "MSExchangeAntispamUpdate" start= auto
  • sc config "MSExchangeEdgeCredential" start= auto
  • sc config "MSExchangeEdgeSync" start= auto
  • sc config "MSExchangeFDS" start= auto
  • sc config "MSExchangeFBA" start= auto
  • sc config "MSExchangeIMAP4" start= auto
  • sc config "MSExchangeIS" start= auto
  • sc config "MSExchangeMailSubmission" start= auto
  • sc config "MSExchangeMailboxAssistants" start= auto
  • sc config "MSExchangeMailboxReplication" start= auto
  • sc config "MSExchangeMonitoring" start= auto
  • sc config "MSExchangeProtectedServiceHost" start= auto
  • sc config "MSExchangeRepl" start= auto
  • sc config "MSExchangeRPC" start= auto
  • sc config "MSExchangeSearch" start= auto
  • sc config "WSBExchange" start= auto
  • sc config "MSExchangeServiceHost" start= auto
  • sc config "MSSpeechService" start= auto
  • sc config "MSExchangeSA" start= auto
  • sc config "MSExchangeThrottling" start= auto
  • sc config "MSExchangeTransport" start= auto
  • sc config "MSExchangeTransportLogSearch" start= auto
  • sc config "MSExchangeUM" start= auto
  • sc config "msftesql-Exchange" start= auto
  • sc config "w3svc" start= auto
  • sc config "iisadmin" start= auto
From here there's nothing left to do but test your newly converted Exchange server. Make sure you can both send and receive.internally and externally. A good resource for testing your e-mail setup is MX Toolbox.